Bluepad32 for NINA-W10 boards
Warning
Deprecated. Will be mantained until August 2024. Depends on 'SPI Flash Legacy' which was removed in ESP-IDF v5.0.
Whenever possible use Arduino + ESP32 platform instead, which has improved features.
What is NINA-W10
NINA-W10 is series of ESP32 modules. These module are present on some Arduino boards like:
- Arduino Nano RP2040 Connect
- Arduino Nano 33 IoT
- Arduino MKR WiFi 1010
- Arduino UNO WiFi Rev.2
- Arduino Arduino MKR Vidor 4000
NINA-W10 modules are co-processors, usually used only to bring WiFi or BLE to the main processor.
To have gamepad support, the original NINA-W10 firmware must be replaced with Bluepad32 firmware. This is a simple step that needs to be done just once and can be "undone" at any time.

This is how it works:
- Gamepad (A) talks to NINA-W10 module (B)
- NINA-W10 module (B) talks to the main processor (C)
Bluepad32 firmware is "compatible-enough" with the original firmware:
- It uses SPI, and the same GPIOs to talk to the main processor
- It uses the same protocol that runs on top of SPI
- But not all messages are implemented, and has some limitations:
- Only Bluepad32 features are implemented
- Bluepad32 logs cannot be seen
- Bluepad32 console not supported
- WiFi API is NOT supported
- BLE API is NOT supported (but BLE controllers ARE supported)
Warning
WiFi and Bluetooth APIs are not supported in NINA-W10 boards.
Option A: Flashing pre-compiled Bluepad32 firmware
To flash Bluepad32 firmware, you have to:
Download the latest pre-compiled Bluepad32 firmware for NINA-W10
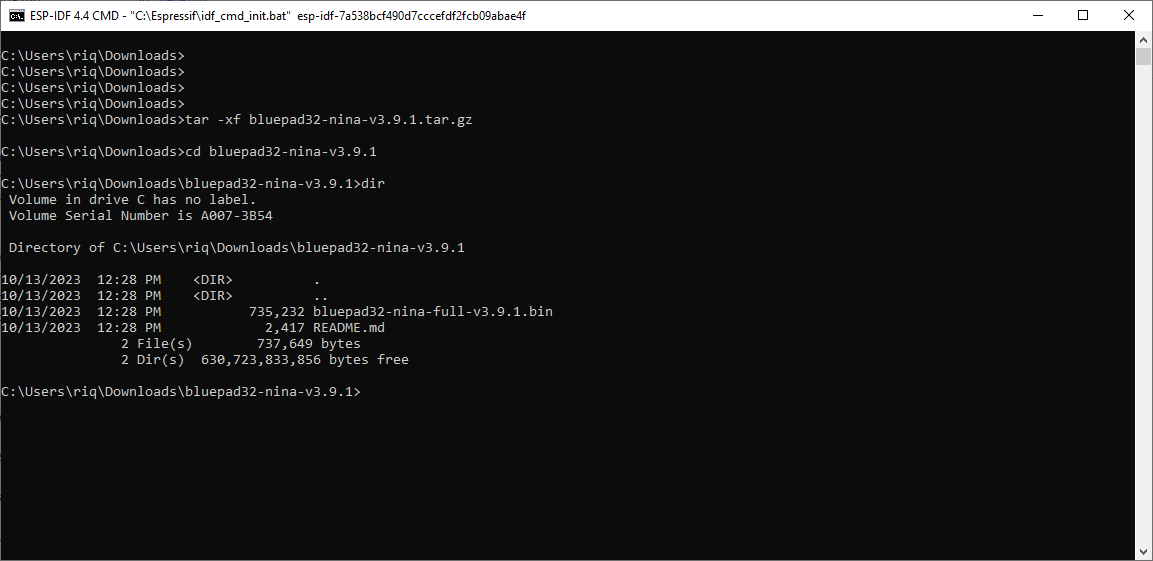
Download latest binary from here: https://github.com/ricardoquesada/bluepad32/releases
- Download the file with "nina" in its name. E.g:
bluepad32-nina-x.y.z.tar.gz - Uncompress it using 7-zip, or from command line (
cmd.exe):
tar -xf bluepad32-nina-x.y.z.tar.gz
cd bluepad32-nina-x.y.z
dir
- And you should see a file named
bluepad32-nina-x.y.z.bin(or similar). You will use it later. Keep reading.
Download arduino-fwuploader
Download the latest binary from here: https://github.com/arduino/arduino-fwuploader/releases
Select correct board name
arduino:samd:mkrwifi1010for Arduino MKR WiFi 1010arduino:samd:nano_33_iotfor Arduino NANO 33 IoTarduino:samd:mkrvidor4000for Arduino MKR Vidor 4000arduino:megaavr:uno2018for Arduino Uno WiFi Rev2arduino:mbed_nano:nanorp2040connectfor Arduino Nano RP2040 Connect
You can see all boards names by doing:
$ arduino-fwuploader firmware list
Flash it
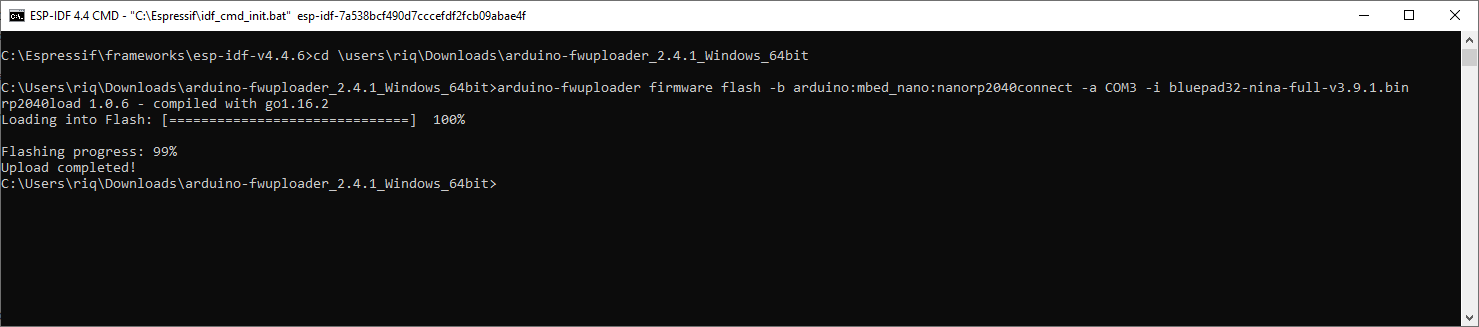
Windows
You have to know:
- COM port: If you don't know which one it is, open Arduino IDE, and go to
Tools->Port: It should be something likeCOM3.- VERY IMPORTANT: Close Arduino IDE after that. The COM port must be "free". Nobody should be using it to flash the firmware.
- The board name: Choose the correct one from the list above
arduino-fwuploader firmware flash -b arduino:mbed_nano:nanorp2040connect -a COM3 -i PATH\TO\bluepad32-nina-full.bin
Linux & macOS
# Replace name and address with the correct ones
export BOARD=arduino:samd:nano_33_iot
export ADDRESS=/dev/ttyACM0
arduino-fwuploader firmware flash -b $BOARD -a $ADDRESS -i bluepad32-nina-full.bin
Verify
To verify that the flash was successful, do:
$ arduino-fwuploader firmware get-version -b $BOARD -a $ADDRESS
And you should see:
...

Firmware version installed: Bluepad32 for NINA v3.6.0-rc0
Option B: Flashing self-compiled Bluepad32 firmware
Note
If you already installed the pre-compiled firmware, skip this step
To flash self-compiled firmware, you should do:
- Put the Arduino board in "pass-through" mode
- Compile it yourself and flash it.
1. Put Arduino board in "passthrough" mode
Before flash Bluepad32 firmware, you have to put the Arduino board in "pass-through" mode:
- Open Arduino IDE
- Install the WiFiNINA library (just do it once)
-
And finally open the
SerialNINAPassthroughsketch: -
File -> Examples -> WiFiNINA -> Tools -> SerialNINAPassthrough
Compile it and flash it to the Arduino board.
2. Compile it yourself and flash it
Install the requirements described here: README.md.
Chose nina as the target platform:
cd ${BLUEPAD32}/src

# Select Nina platform:
# Components config -> Bluepad32 -> Target Platform -> Nina
idf.py menuconfig

# And then compile it!
idf.py build
On Nano 32 IoT / MKR WIFI 1010, doing idf.py flash will just work.
# Only valid for:
#   * Nano 33 IoT
#   * MKR WIFI 1010

# Port might be different
export ESPPORT=/dev/ttyACM0

idf.py flash
But on NANO RP2040 Connect and UNO WiFi Rev.2, you have to flash it using the --before no_reset option,
and NOT --before default_reset. E.g:
# Only valid for:
#   * Nano RP2040 Connect
#   * UNO WiFi Rev.2

# Port might be different
export ESPPORT=/dev/ttyACM0

esptool.py --port ${ESPPORT} --baud 115200 --before no_reset write_flash 0x1000 ./build/bootloader/bootloader.bin 0x10000 ./build/bluepad32-airlift.bin 0x8000 ./build/partitions_singleapp.bin
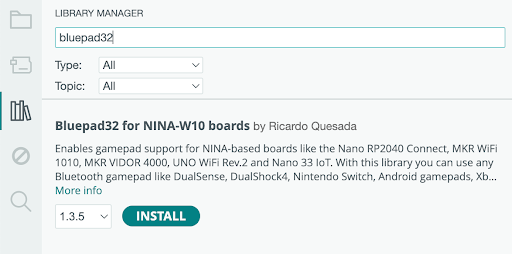
Install Arduino Library
You need to install the Bluepad32-arduino library:
From Arduino Menu do: Tools -> Manage Libraries... -> Search for "bluepad32" and install it.
Example
After choosing your board, from Arduino Menu do: File -> Examples -> Bluepad32 -> Controller

Compile it and flash it. Done! 
Note
The board must be the regular Arduino board. E.g.: "Arduino Uno WiFi Rev2". And NOT any of the "esp32 + bluepad32" boards.