Bluepad32 for Arduino + ESP32
Supported boards
It works on any ESP32 / ESP32-S3 / ESP32-C3 module where the Arduino Core for ESP32 runs. In other words, if you already have Arduino working on a ESP32 / ESP32-S3 / ESP32-C3 module, you can have Bluepad32 running on it as well.
Bug
No output in certain ESP32-S3 boards like Arduino Nano ESP32 or Lolin S3 Mini ?
Read Github issue #65 to see how to enable it.
There are two ways to setup a Bluepad32 Arduino project for ESP32 chips:
- Option A: Use Arduino IDE
- Recommended for Arduino IDE users.
- Option B: Use ESP-IDF + template project
- Recommended advanced users.
- Fine-tune your project
- Includes advanced features
Option A: Use "Arduino Core for ESP32 + Bluepad32" board
RECOMMENDED for Arduino IDE users.
These 4 steps are needed:
- Add ESP32 and Bluepad32 board packages to Board Manager
- Install ESP32 and Bluepad32 files
- Select a "ESP32 + Bluepad32" board
- Open the "Bluepad32" example
1. Add ESP32 and Bluepad32 board packages to Board Manager
These two boards must be added to Arduino IDE.

- Official ESP32 package:
https://raw.githubusercontent.com/espressif/arduino-esp32/gh-pages/package_esp32_index.json - "Bluepad32 + ESP32"
package:
https://raw.githubusercontent.com/ricardoquesada/esp32-arduino-lib-builder/master/bluepad32_files/package_esp32_bluepad32_index.json
If you don't know how to add a board, then read Add or Remove 3rd party boards in Board Manager
2. Install ESP32 and Bluepad32 files
After adding both the ESP32 & Bluepad32 boards:
- go to:
Tools->Board->Board Manager - Install
ESP32board package - And install the
ESP32 + Bluepad32board package

3. Select a "ESP32 + Bluepad32" board
Then choose any of the "ESP32 + Bluepad32" boards:
Tools->Board->ESP32 + Bluepad32 Arduino-> The board you are using

4. Open the "Bluepad32" example

Finally, open the Bluepad32 example:
File->Examples->Bluepad32_ESP32->Controller
And compile & flash!
Option B: Use ESP-IDF + template project
Note
Recommended for advanced users.
Clone the template project
git clone --recursive https://github.com/ricardoquesada/esp-idf-arduino-bluepad32-template.git my_project
To install and use ESP-IDF you have two options:
- a) Using PlatformIO
- b) Or manually install ESP-IDF toolchain
A) Using PlatformIO + ESP-IDF

- Open Visual Studio Code, select the PlatformIO plugin
- Click on "Pick a folder", a select the recently cloned "my_project" folder
That's it. The PlatformIO will download the ESP-IDF toolchain and its dependencies.
It might take a few minutes to download all dependencies. Be patient.
After all dependencies were installed:
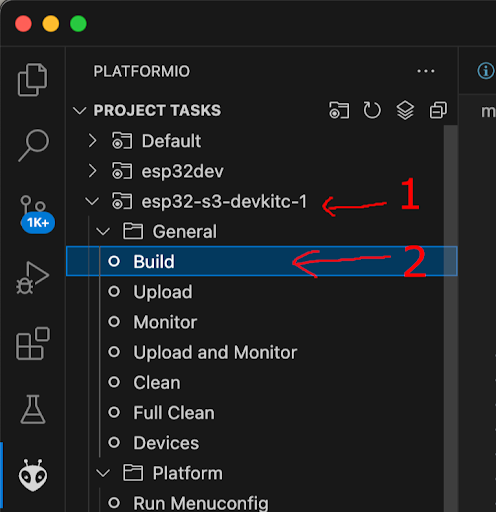
- Click on one of the pre-created boards, like esp32-s3-devkit-1. Or edit
platformio.inifile, and add your own. - Click on build

Finally, click on "Upload and Monitor":
- It will upload your sketch
- And will enter into "monitor" mode: You can see and use the console. Try typing
helpon the console.
B) Manually installing ESP-IDF
Install ESP-IDF toolchain by following these instructions:
Compile template project and flash it
To compile it and flash it, do:
# cd to your project folder
cd my_project

# To compile it do:
idf.py build

# To flash it do:
idf.py flash monitor
To fine-tune it do:
# Add / edit / remove components with:
idf.py menuconfig
Further reading
Detailed instructions here: https://github.com/ricardoquesada/esp-idf-arduino-bluepad32-template